
Spring Boot简单学习
Spring Boot
前置准备
Maven配置加入阿里镜像加速,适配jdk1.8的版本
1 | <mirrors> |
pom.xml添加依赖及父类
1 | <parent> |
远离配置地狱()
写一个主程序入口MainApplication
1 | /** |
控制器
1 |
|
然后运行Main入口,我们会发现内置的Tomcat已经开启,直接访问8080端口下的hello即可。和SSM配置地狱说拜拜。
application.preperties(配置文件管理)
由于SpringBoot已经把所有基本配置准备好了,我们可以省去很多配置操作,且专门设置一个application.preperties文件来管理SprinigBoot的细节更改,比如更换Tomcat的端口号,不用去修改其配置文件,只用在application中声明即可。官方整合了具体可配置的参数列表:
jar包插件
在pom.xml引入插件,可以将项目打出jar包,命令行直接运行即可。
1 | <build> |
上手两分钟后,我只想说SpringBoot香的一批,什么配置文件啊?我tm可没听说过要配置。连Tomcat都省去了,直接内置,nb真tm nb。
配置简析
依赖管理
我们的pom.xml导入了一个父项目进行依赖管理
1 | <!-- 父项目 --> |
以后依赖要使用时无需写版本号,都是在父项目中设定好的,但可以自己更换版本(Maven就近原则)
1 | <!-- 定义一个属性更改版本 --> |
当然使用未声明的依赖,我们还是要写版本的
场景启动器
官方列举了所有启动器:
1 | 启动某一个场景的格式,*就是对应的场景,比方最开始我们使用的web,也就是web场景启动器 |
自动装配
spring-boot-starter-web展示
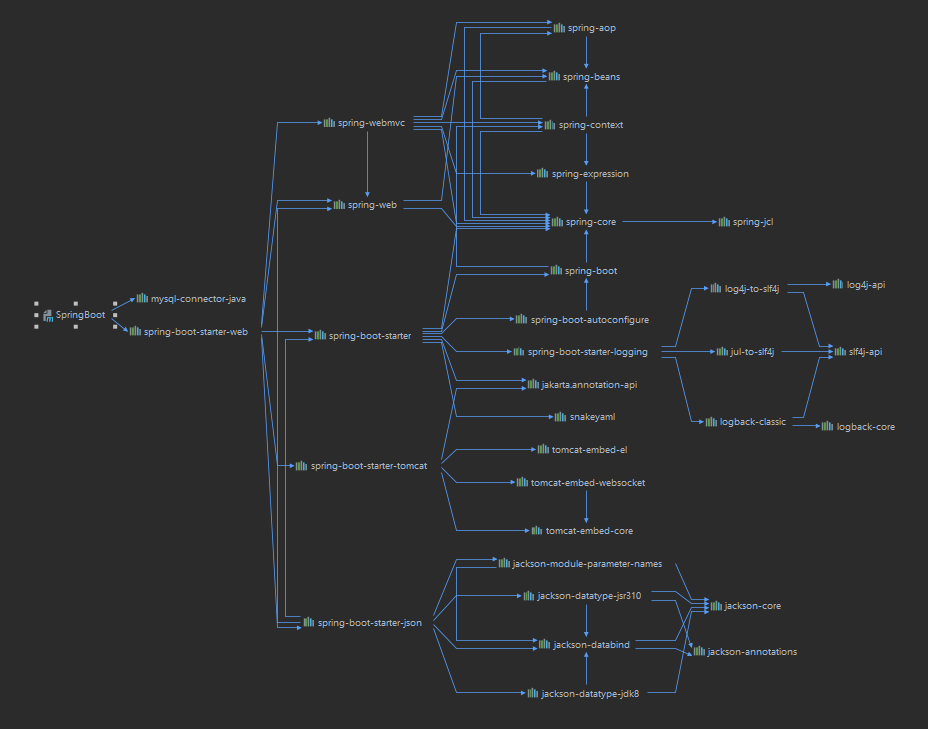
1 | <dependency> |
可以发现Tomcat、Spring、SpringMVC都配置了
然后可以在主程序入口获取IoC容器,打印所有组件查看是否装配齐全
1 |
|
结果中是可以找到字符编码过滤、文件上传、DispatcherServlet等组件,SpringBoot是真nm方便😂
包扫描
我们现在也不用配置包扫描,官网说的很清楚(https://docs.spring.io/spring-boot/docs/current/reference/html/using.html#using.structuring-your-code.locating-the-main-class),**和主程序同一包及其子包的组件均会被默认扫描**。若不同包放其他位置可以用其他注解完成扫描:
1 | //填包名 |
1 |
|
配置的默认值
所有的配置文件都是对应某个类,然后该类会在容器里创建对象。
按需配置自动配置,根据导入的场景来导入对应依赖,而不是全部一口气导入。
配置过程总结
- 场景启动 spring-boot-starter-*
- 走相关的自动配置类 XXXAutoConfiguration,然后会导入XXX的组件
- 在XXX组件中绑定 XXXProperties,绑定配置文件的相关属性
基础注解
@Configuration
1 | /** |
在主程序中测试
注意啊proxyBeanMethods只影响从配置类调用方法的对象,你直接从容器拿的对象,永远都是单例
1 | //容器获取组件,组件是单实例的 |
个人理解:这就是一个时间与空间消耗的问题。
proxyBeanMethods参数为true时,每次从配置类拿对象会先判断是否已生成,有就直接用,没有再生成,所以每次调用前都会判断是否已生成,时间效率就低了,但相对就是单例比较省空间。bean只生成1次。
proxyBeanMethods参数为false时,每次从配置类拿对象不会判断,需要就自行新建,再一开始启动springboot时更加快速,但会创建多个对象,空间效率相比降低,只是加载更快。bean会创建多次。
二者对比,如果配置类中没有方法相互依赖,则使用false,说明该方法使用的时候不确定,可以跳过判断,节省每次加载的时间,等需要时再新建,毕竟空间换时间划得来。有相互依赖的场景还是使用true,说明调用A就会需要B,B就和A、B的创建都有了联系,明显使用频率变高,应该使用单例节省空间。
@Import
1 | //@Import value填入数组,容器中会自动创建这些类型的组件,默认名是该类的全类名 |
1 | com.tang.boot.pojo.User |
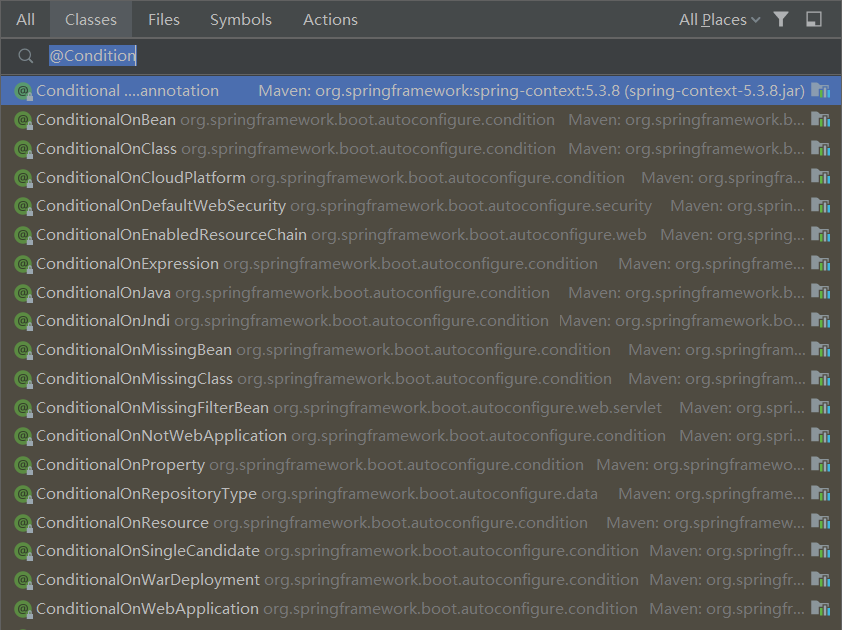
@Conditional(条件装配)
使用@Condition相关的注解,根据其条件来注入组件,参数可以传名字、类型等,只有满足对应参数的组件存在时,被注解的类、方法才会创建组件。(注解可用于方法和类上)
@ImportResource
使用@ImportResource()来导入以前的传统xml配置文件,这个资源导入的注解写在主程序入口上即可,其参数使用classpath:指向程序运行后target/classes下的对应位置。
配置绑定相关:@ConfigurationProperties
@Component(作用于bean)
将组件与配置文件设定的数据进行绑定,并通过@Component注入到容器中,两个注解都是写在bean上的,每一个导入配置的bean,都要注入容器。
配置文件:
1 | = BenChi |
bean:注意一定要将bean注册到spring,其配置文件导入的操作才会生效。
1 |
|
@EnableConfigurationProperties(作用于配置类)
先在对应的bean上导入配置,然后在调用了bean的配置类上使用@EnableConfigurationProperties,参数是bean对应的类。可同时声明多个bean。将对应类的组件进行配置绑定,然后将组件注入到容器中。
1 |
|
自动配置:@SpringBootApplication
1 |
|
@SpringBootConfiguration
1 |
|
使用该注解代表是一个配置类
@ComponentScan
包扫描,指定Spring要扫描的包
@EnableAutoConfiguration(重点)
自动装配+组件筛选
1 |
|
AutoConfigurationPackage
1 | //导入了Registrar.class,使用它给容器导入一系列的组件 |
也就是Registrar中的这句话。获取包下所有组件,以数组传入。
1 | new AutoConfigurationPackages.PackageImports(metadata)).getPackageNames().toArray(new String[0]) |
@Import({AutoConfigurationImportSelector.class})
AutoConfigurationImportSelector的selectImports方法有一句话
1
AutoConfigurationImportSelector.AutoConfigurationEntry autoConfigurationEntry = this.getAutoConfigurationEntry(annotationMetadata);
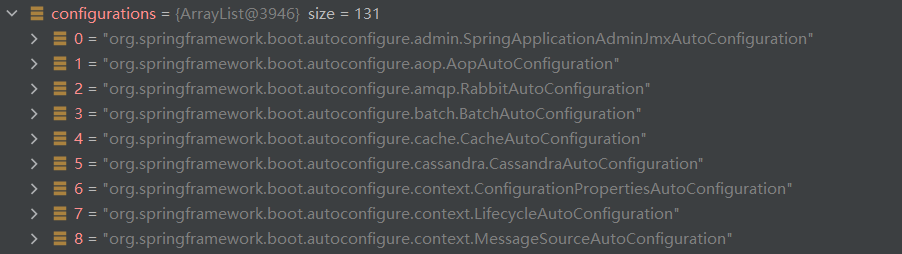
其中调用了本身的getAutoConfigurationEntry获取全部自动装配的数组,那么我们就去看看这个方法,在该方法中,又使用getCandidateConfigurations获取配置的组件,然后对组件进行了一系列的操作(过滤、去重等等),最后返回组件。下图很明显看到有131个组件。
1
List<String> configurations = this.getCandidateConfigurations(annotationMetadata, attributes);
然后我们再去看看getCandidateConfigurations是怎么获取的,它使用了一个Spring的工厂加载器
1
List<String> configurations = SpringFactoriesLoader.loadFactoryNames(this.getSpringFactoriesLoaderFactoryClass(), this.getBeanClassLoader());
接着又调用了loadFactoryNames,然后返回loadSpringFactories,也就是一个Map
1
2
3
4
5private static Map<String, List<String>> loadSpringFactories(ClassLoader classLoader){
·····
Enumeration urls = classLoader.getResources("META-INF/spring.factories");
·····
}我们会发现它获取了一个META-INF/spring.factories位置的文件,所有导入的依赖有这个文件都会被扫描。比较核心的就是spring-boot-autoconfigure包中的spring.factories文件,它里面写了容器所需要的全部配置类,每次SpringBoot启动就会加载。但并不是全部都生效,是按需求开启的。
1
2
3
4
5
6
7
8
9
10
11
12
13
14
15
16
17
18
19
20
21
22
23
24
25
26
27
28
29
30
31
32
33
34
35
36
37
38
39
40
41
42
43
44
45
46
47
48
49
50
51
52
53
54
55
56
57
58
59
60
61
62
63
64
65
66
67
68
69
70
71
72
73
74
75
76
77
78
79
80
81
82
83
84
85
86
87
88
89
90
91
92
93
94
95
96
97
98
99
100
101
102
103
104
105
106
107
108
109
110
111
112
113
114
115
116
117
118
119
120
121
122
123
124
125
126
127
128
129
130
131
132
133# Auto Configure
org.springframework.boot.autoconfigure.EnableAutoConfiguration=\
org.springframework.boot.autoconfigure.admin.SpringApplicationAdminJmxAutoConfiguration,\
org.springframework.boot.autoconfigure.aop.AopAutoConfiguration,\
org.springframework.boot.autoconfigure.amqp.RabbitAutoConfiguration,\
org.springframework.boot.autoconfigure.batch.BatchAutoConfiguration,\
org.springframework.boot.autoconfigure.cache.CacheAutoConfiguration,\
org.springframework.boot.autoconfigure.cassandra.CassandraAutoConfiguration,\
org.springframework.boot.autoconfigure.context.ConfigurationPropertiesAutoConfiguration,\
org.springframework.boot.autoconfigure.context.LifecycleAutoConfiguration,\
org.springframework.boot.autoconfigure.context.MessageSourceAutoConfiguration,\
org.springframework.boot.autoconfigure.context.PropertyPlaceholderAutoConfiguration,\
org.springframework.boot.autoconfigure.couchbase.CouchbaseAutoConfiguration,\
org.springframework.boot.autoconfigure.dao.PersistenceExceptionTranslationAutoConfiguration,\
org.springframework.boot.autoconfigure.data.cassandra.CassandraDataAutoConfiguration,\
org.springframework.boot.autoconfigure.data.cassandra.CassandraReactiveDataAutoConfiguration,\
org.springframework.boot.autoconfigure.data.cassandra.CassandraReactiveRepositoriesAutoConfiguration,\
org.springframework.boot.autoconfigure.data.cassandra.CassandraRepositoriesAutoConfiguration,\
org.springframework.boot.autoconfigure.data.couchbase.CouchbaseDataAutoConfiguration,\
org.springframework.boot.autoconfigure.data.couchbase.CouchbaseReactiveDataAutoConfiguration,\
org.springframework.boot.autoconfigure.data.couchbase.CouchbaseReactiveRepositoriesAutoConfiguration,\
org.springframework.boot.autoconfigure.data.couchbase.CouchbaseRepositoriesAutoConfiguration,\
org.springframework.boot.autoconfigure.data.elasticsearch.ElasticsearchDataAutoConfiguration,\
org.springframework.boot.autoconfigure.data.elasticsearch.ElasticsearchRepositoriesAutoConfiguration,\
org.springframework.boot.autoconfigure.data.elasticsearch.ReactiveElasticsearchRepositoriesAutoConfiguration,\
org.springframework.boot.autoconfigure.data.elasticsearch.ReactiveElasticsearchRestClientAutoConfiguration,\
org.springframework.boot.autoconfigure.data.jdbc.JdbcRepositoriesAutoConfiguration,\
org.springframework.boot.autoconfigure.data.jpa.JpaRepositoriesAutoConfiguration,\
org.springframework.boot.autoconfigure.data.ldap.LdapRepositoriesAutoConfiguration,\
org.springframework.boot.autoconfigure.data.mongo.MongoDataAutoConfiguration,\
org.springframework.boot.autoconfigure.data.mongo.MongoReactiveDataAutoConfiguration,\
org.springframework.boot.autoconfigure.data.mongo.MongoReactiveRepositoriesAutoConfiguration,\
org.springframework.boot.autoconfigure.data.mongo.MongoRepositoriesAutoConfiguration,\
org.springframework.boot.autoconfigure.data.neo4j.Neo4jDataAutoConfiguration,\
org.springframework.boot.autoconfigure.data.neo4j.Neo4jReactiveDataAutoConfiguration,\
org.springframework.boot.autoconfigure.data.neo4j.Neo4jReactiveRepositoriesAutoConfiguration,\
org.springframework.boot.autoconfigure.data.neo4j.Neo4jRepositoriesAutoConfiguration,\
org.springframework.boot.autoconfigure.data.r2dbc.R2dbcDataAutoConfiguration,\
org.springframework.boot.autoconfigure.data.r2dbc.R2dbcRepositoriesAutoConfiguration,\
org.springframework.boot.autoconfigure.data.redis.RedisAutoConfiguration,\
org.springframework.boot.autoconfigure.data.redis.RedisReactiveAutoConfiguration,\
org.springframework.boot.autoconfigure.data.redis.RedisRepositoriesAutoConfiguration,\
org.springframework.boot.autoconfigure.data.rest.RepositoryRestMvcAutoConfiguration,\
org.springframework.boot.autoconfigure.data.web.SpringDataWebAutoConfiguration,\
org.springframework.boot.autoconfigure.elasticsearch.ElasticsearchRestClientAutoConfiguration,\
org.springframework.boot.autoconfigure.flyway.FlywayAutoConfiguration,\
org.springframework.boot.autoconfigure.freemarker.FreeMarkerAutoConfiguration,\
org.springframework.boot.autoconfigure.groovy.template.GroovyTemplateAutoConfiguration,\
org.springframework.boot.autoconfigure.gson.GsonAutoConfiguration,\
org.springframework.boot.autoconfigure.h2.H2ConsoleAutoConfiguration,\
org.springframework.boot.autoconfigure.hateoas.HypermediaAutoConfiguration,\
org.springframework.boot.autoconfigure.hazelcast.HazelcastAutoConfiguration,\
org.springframework.boot.autoconfigure.hazelcast.HazelcastJpaDependencyAutoConfiguration,\
org.springframework.boot.autoconfigure.http.HttpMessageConvertersAutoConfiguration,\
org.springframework.boot.autoconfigure.http.codec.CodecsAutoConfiguration,\
org.springframework.boot.autoconfigure.influx.InfluxDbAutoConfiguration,\
org.springframework.boot.autoconfigure.info.ProjectInfoAutoConfiguration,\
org.springframework.boot.autoconfigure.integration.IntegrationAutoConfiguration,\
org.springframework.boot.autoconfigure.jackson.JacksonAutoConfiguration,\
org.springframework.boot.autoconfigure.jdbc.DataSourceAutoConfiguration,\
org.springframework.boot.autoconfigure.jdbc.JdbcTemplateAutoConfiguration,\
org.springframework.boot.autoconfigure.jdbc.JndiDataSourceAutoConfiguration,\
org.springframework.boot.autoconfigure.jdbc.XADataSourceAutoConfiguration,\
org.springframework.boot.autoconfigure.jdbc.DataSourceTransactionManagerAutoConfiguration,\
org.springframework.boot.autoconfigure.jms.JmsAutoConfiguration,\
org.springframework.boot.autoconfigure.jmx.JmxAutoConfiguration,\
org.springframework.boot.autoconfigure.jms.JndiConnectionFactoryAutoConfiguration,\
org.springframework.boot.autoconfigure.jms.activemq.ActiveMQAutoConfiguration,\
org.springframework.boot.autoconfigure.jms.artemis.ArtemisAutoConfiguration,\
org.springframework.boot.autoconfigure.jersey.JerseyAutoConfiguration,\
org.springframework.boot.autoconfigure.jooq.JooqAutoConfiguration,\
org.springframework.boot.autoconfigure.jsonb.JsonbAutoConfiguration,\
org.springframework.boot.autoconfigure.kafka.KafkaAutoConfiguration,\
org.springframework.boot.autoconfigure.availability.ApplicationAvailabilityAutoConfiguration,\
org.springframework.boot.autoconfigure.ldap.embedded.EmbeddedLdapAutoConfiguration,\
org.springframework.boot.autoconfigure.ldap.LdapAutoConfiguration,\
org.springframework.boot.autoconfigure.liquibase.LiquibaseAutoConfiguration,\
org.springframework.boot.autoconfigure.mail.MailSenderAutoConfiguration,\
org.springframework.boot.autoconfigure.mail.MailSenderValidatorAutoConfiguration,\
org.springframework.boot.autoconfigure.mongo.embedded.EmbeddedMongoAutoConfiguration,\
org.springframework.boot.autoconfigure.mongo.MongoAutoConfiguration,\
org.springframework.boot.autoconfigure.mongo.MongoReactiveAutoConfiguration,\
org.springframework.boot.autoconfigure.mustache.MustacheAutoConfiguration,\
org.springframework.boot.autoconfigure.neo4j.Neo4jAutoConfiguration,\
org.springframework.boot.autoconfigure.netty.NettyAutoConfiguration,\
org.springframework.boot.autoconfigure.orm.jpa.HibernateJpaAutoConfiguration,\
org.springframework.boot.autoconfigure.quartz.QuartzAutoConfiguration,\
org.springframework.boot.autoconfigure.r2dbc.R2dbcAutoConfiguration,\
org.springframework.boot.autoconfigure.r2dbc.R2dbcTransactionManagerAutoConfiguration,\
org.springframework.boot.autoconfigure.rsocket.RSocketMessagingAutoConfiguration,\
org.springframework.boot.autoconfigure.rsocket.RSocketRequesterAutoConfiguration,\
org.springframework.boot.autoconfigure.rsocket.RSocketServerAutoConfiguration,\
org.springframework.boot.autoconfigure.rsocket.RSocketStrategiesAutoConfiguration,\
org.springframework.boot.autoconfigure.security.servlet.SecurityAutoConfiguration,\
org.springframework.boot.autoconfigure.security.servlet.UserDetailsServiceAutoConfiguration,\
org.springframework.boot.autoconfigure.security.servlet.SecurityFilterAutoConfiguration,\
org.springframework.boot.autoconfigure.security.reactive.ReactiveSecurityAutoConfiguration,\
org.springframework.boot.autoconfigure.security.reactive.ReactiveUserDetailsServiceAutoConfiguration,\
org.springframework.boot.autoconfigure.security.rsocket.RSocketSecurityAutoConfiguration,\
org.springframework.boot.autoconfigure.security.saml2.Saml2RelyingPartyAutoConfiguration,\
org.springframework.boot.autoconfigure.sendgrid.SendGridAutoConfiguration,\
org.springframework.boot.autoconfigure.session.SessionAutoConfiguration,\
org.springframework.boot.autoconfigure.security.oauth2.client.servlet.OAuth2ClientAutoConfiguration,\
org.springframework.boot.autoconfigure.security.oauth2.client.reactive.ReactiveOAuth2ClientAutoConfiguration,\
org.springframework.boot.autoconfigure.security.oauth2.resource.servlet.OAuth2ResourceServerAutoConfiguration,\
org.springframework.boot.autoconfigure.security.oauth2.resource.reactive.ReactiveOAuth2ResourceServerAutoConfiguration,\
org.springframework.boot.autoconfigure.solr.SolrAutoConfiguration,\
org.springframework.boot.autoconfigure.sql.init.SqlInitializationAutoConfiguration,\
org.springframework.boot.autoconfigure.task.TaskExecutionAutoConfiguration,\
org.springframework.boot.autoconfigure.task.TaskSchedulingAutoConfiguration,\
org.springframework.boot.autoconfigure.thymeleaf.ThymeleafAutoConfiguration,\
org.springframework.boot.autoconfigure.transaction.TransactionAutoConfiguration,\
org.springframework.boot.autoconfigure.transaction.jta.JtaAutoConfiguration,\
org.springframework.boot.autoconfigure.validation.ValidationAutoConfiguration,\
org.springframework.boot.autoconfigure.web.client.RestTemplateAutoConfiguration,\
org.springframework.boot.autoconfigure.web.embedded.EmbeddedWebServerFactoryCustomizerAutoConfiguration,\
org.springframework.boot.autoconfigure.web.reactive.HttpHandlerAutoConfiguration,\
org.springframework.boot.autoconfigure.web.reactive.ReactiveWebServerFactoryAutoConfiguration,\
org.springframework.boot.autoconfigure.web.reactive.WebFluxAutoConfiguration,\
org.springframework.boot.autoconfigure.web.reactive.error.ErrorWebFluxAutoConfiguration,\
org.springframework.boot.autoconfigure.web.reactive.function.client.ClientHttpConnectorAutoConfiguration,\
org.springframework.boot.autoconfigure.web.reactive.function.client.WebClientAutoConfiguration,\
org.springframework.boot.autoconfigure.web.servlet.DispatcherServletAutoConfiguration,\
org.springframework.boot.autoconfigure.web.servlet.ServletWebServerFactoryAutoConfiguration,\
org.springframework.boot.autoconfigure.web.servlet.error.ErrorMvcAutoConfiguration,\
org.springframework.boot.autoconfigure.web.servlet.HttpEncodingAutoConfiguration,\
org.springframework.boot.autoconfigure.web.servlet.MultipartAutoConfiguration,\
org.springframework.boot.autoconfigure.web.servlet.WebMvcAutoConfiguration,\
org.springframework.boot.autoconfigure.websocket.reactive.WebSocketReactiveAutoConfiguration,\
org.springframework.boot.autoconfigure.websocket.servlet.WebSocketServletAutoConfiguration,\
org.springframework.boot.autoconfigure.websocket.servlet.WebSocketMessagingAutoConfiguration,\
org.springframework.boot.autoconfigure.webservices.WebServicesAutoConfiguration,\
org.springframework.boot.autoconfigure.webservices.client.WebServiceTemplateAutoConfiguration由于每一个对应的组件都是有@Conditional进行条件筛选,所以不会一股脑全加载,只有在导入相应的包后再加载,也就实现了按需装配。
默认配置
SpringBoot会在底层配置全部组件,但会以用户配置的优先,也就是说底层配置的组件常常带有**@ConditionalOnMissingBean**注解,我们不配置就帮我们配,我们配置了就用我们的。
SpringBoot底层其实就是帮我们把以前的配置类都配置了,它的类上也常使用**@EnableConfigurationProperties**注解来引用配置文件。
定制化修改
- 修改底层@bean的组件
- 修改组件引用配置文件的相关字段,直接在application.properties进行相关字段修改即可。
小技巧
配置文件设置 debug=true(原来是false),然后启动项目会自动生成报告,展示生效(Positive)和未生效(Negative)的组件
前面也提过,官方列举了所有可修改的配置文件字段:
ReStart:dev-tools
1
2
3
4
5<dependency>
<groupId>org.springframework.boot</groupId>
<artifactId>spring-boot-devtools</artifactId>
<optional>true</optional>
</dependency>ctrl+F9快速重启
配置文件:yaml
key: value,注意value前有空格。
缩进表示层级关系,字符串使用无需引号,若使用单引号会转义字符内容,双引号不会转义字符内容。
其实书写格式很类似我们博客的配置文件,一些数据结构的格式就不赘述了。
使用以下依赖,可在yml中加入提示,但这个提示插件只是为了方便开发,所以在打包时应隔离这个与后续无关的依赖。
1 | <dependency> |
Web开发
官网信息:https://docs.spring.io/spring-boot/docs/current/reference/html/features.html#features
静态资源
静态资源访问
静态资源目录
在资源文件夹resources下的这四种路径,它们的静态资源都会被springboot自动解析:
/static or /public or /resources or /META-INF/resources
访问时直接打资源名即可:localhost:8080/ + 资源名
访问顺序
优先访问Controller的请求路径,找不到再去访问静态资源,静态资源也没有则说明无法访问,响应404界面
增加静态资源访问前缀
在配置文件yml中加入
1 | spring: |
访问路径变为:localhost:8080/static + 资源名
可以方便我们后续过滤器进行资源过滤不影响静态资源。
欢迎页面
静态资源路径下的 index.html 会自动映射为首页。
但设置访问前缀后index首页不会自动映射。
index页面映射和静态资源前缀冲突。
网页图标 favicon.ico
和欢迎界面一致,文件名:favicon.ico在静态资源中会被自动解析为网站的小图标。
favicon.ico也会受静态资源前缀影响。
静态资源配置原理解析
SpringBoot启动后会默认加载各种AutoConfiguration
其中SpringMVC的自动配置类WebMvcAutoConfiguration生效
1
2
3
4
5
6
7
public class WebMvcAutoConfiguration { }配置文件和WebMvcProperties、ResourceProperties、 WebProperties这三个类相关
1
2
3
4
5
public static class WebMvcAutoConfigurationAdapter implements WebMvcConfigurer, ServletContextAware { }WebMvcProperties对应spring.mvc
1
2
public class WebMvcProperties { }ResourceProperties对应spring.resources
1
2
public class ResourceProperties extends Resources { }
配置类只有一个有参构造器
1
2
3
4
5
6
7
8
9
10public WebMvcAutoConfigurationAdapter(ResourceProperties resourceProperties, WebProperties webProperties, WebMvcProperties mvcProperties, ListableBeanFactory beanFactory, ObjectProvider<HttpMessageConverters> messageConvertersProvider, ObjectProvider<WebMvcAutoConfiguration.ResourceHandlerRegistrationCustomizer> resourceHandlerRegistrationCustomizerProvider, ObjectProvider<DispatcherServletPath> dispatcherServletPath, ObjectProvider<ServletRegistrationBean<?>> servletRegistrations) {
this.resourceProperties = (Resources)(resourceProperties.hasBeenCustomized() ? resourceProperties : webProperties.getResources());
this.mvcProperties = mvcProperties;
this.beanFactory = beanFactory;
this.messageConvertersProvider = messageConvertersProvider;
this.resourceHandlerRegistrationCustomizer = (WebMvcAutoConfiguration.ResourceHandlerRegistrationCustomizer)resourceHandlerRegistrationCustomizerProvider.getIfAvailable();
this.dispatcherServletPath = dispatcherServletPath;
this.servletRegistrations = servletRegistrations;
this.mvcProperties.checkConfiguration();
}ResourceProperties.resources绑定的相关值
WebMvcProperties.mvc绑定的相关值
ListableBeanFactory:容器工厂,IoC容器
HttpMessageConverters:容器中找到信息转换器
ResourceHandlerRegistrationCustomizer:资源处理器的自定义
DispatcherServletPath:前端控制器
ServletRegistrationBean:注册Servlet、Filter等
静态资源的自动加载
1
2
3
4
5
6
7
8
9
10
11
12
13
14
15public void addResourceHandlers(ResourceHandlerRegistry registry) {
if (!this.resourceProperties.isAddMappings()) {
logger.debug("Default resource handling disabled");
} else {
this.addResourceHandler(registry, "/webjars/**", "classpath:/META-INF/resources/webjars/");
this.addResourceHandler(registry, this.mvcProperties.getStaticPathPattern(), (registration) -> {
registration.addResourceLocations(this.resourceProperties.getStaticLocations());
if (this.servletContext != null) {
ServletContextResource resource = new ServletContextResource(this.servletContext, "/");
registration.addResourceLocations(new Resource[]{resource});
}
});
}
}可手动关闭加载静态资源
1
2
3spring:
resources:
add-mappings: false首页的自动加载
HandlerMapping保存每个Handler的处理请求关系
1
2
3
4
5
6
7
public WelcomePageHandlerMapping welcomePageHandlerMapping(ApplicationContext applicationContext, FormattingConversionService mvcConversionService, ResourceUrlProvider mvcResourceUrlProvider) {
WelcomePageHandlerMapping welcomePageHandlerMapping = new WelcomePageHandlerMapping(new TemplateAvailabilityProviders(applicationContext), applicationContext, this.getWelcomePage(), this.mvcProperties.getStaticPathPattern());
welcomePageHandlerMapping.setInterceptors(this.getInterceptors(mvcConversionService, mvcResourceUrlProvider));
welcomePageHandlerMapping.setCorsConfigurations(this.getCorsConfigurations());
return welcomePageHandlerMapping;
}可以发现首页是底层写死的,所以加前缀就无法加载
1
2
3
4
5
6
7
8
9WelcomePageHandlerMapping(TemplateAvailabilityProviders templateAvailabilityProviders, ApplicationContext applicationContext, Resource welcomePage, String staticPathPattern) {
if (welcomePage != null && "/**".equals(staticPathPattern)) {
logger.info("Adding welcome page: " + welcomePage);
this.setRootViewName("forward:index.html");
} else if (this.welcomeTemplateExists(templateAvailabilityProviders, applicationContext)) {
logger.info("Adding welcome page template: index");
this.setRootViewName("index");
}
}
表单自定义REST风格
为了方便请求库路径的书写,我们使用REST风格进行请求,这样请求路径的书写就很简便了。都是user路径,却可以根据不同的提交请求得到对应的结果
表单使用REST风格前提是要开启自动配置的功能,因为表单只有get、post请求,这里开启filter就可以将自定义方式的值返回
1 | spring: |
我们提交方法选择post,然后加入隐藏域方法,其参数是我们自定义的提交方式。
1 | <form action="/user" method="post"> |
然后我们就可以走对应的请求了
1 | //@RequestMapping(value = "/user",method = RequestMethod.PUT) |
可以发现在WebMvcAutoConfiguration中有相关配置
1 |
|
这个配置的本质就是走HiddenHttpMethodFilter,在这个类中,我们会重写getmethod()方法,将自定义的值进行返回,从而实现自定义的请求方式
参数请求
请求映射
SpringBoot请求还是走的MVC的DispatcherServlet,而Servlet肯定要重写doGet等请求方法,我们可以发现DispatcherServlet的父类FrameworkServlet重写了这些方法,且这些方法最后都去了processRequest
1 | protected final void doGet(HttpServletRequest request, HttpServletResponse response) throws ServletException, IOException { |
1 | protected final void processRequest(HttpServletRequest request, HttpServletResponse response){ |
然后我们发现processRequest核心就是调用doService方法,然后发现该类的doService是抽象方法,所以我们来子类看它是如何实现的,然后发现除了基础的设置外,它走了一个doDispatch方法
1 | protected void doService(HttpServletRequest request, HttpServletResponse response){ |
总结就是所有的请求最后走的都是这个doDispatch方法,可以发现所有的请求都走了getHandler方法,然后顺藤摸瓜来到getHandler
1 | protected void doDispatch(HttpServletRequest request, HttpServletResponse response){ |
1 |
|
我们在getHandler方法中发现了一个handlerMappings变量,调试模式下可以发现它包含5个映射关系,其中关键RequestMappinghandlerMapping
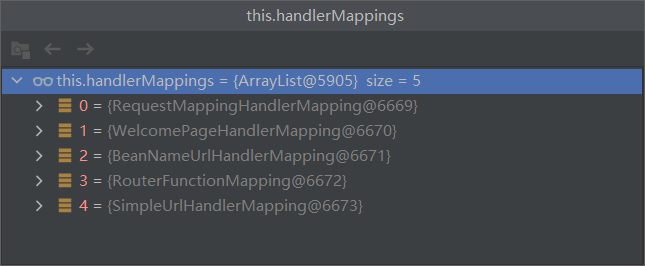
RequestMappinghandlerMapping:@RequestMapping以及它的handler的映射关系,全部都保存到了这里。
也就是handlerMappings获取了所有的请求关系映射。请求进来会遍历全部的映射关系,逐个对HandlerMapping进行查找
在WebMvcAutoConfiguration自动配置类中,我们也可以找到RequestMappingHandlerMapping和WelcomePageHandlerMapping说明SpringBoot都是有配置的。
各种参数类型的传递
注解传参
@PathVariable:对应请求路径来获取参数。
@RequestHeader:有参数,只拿对应的请求数据,无参数拿全部请求头。
@RequestParam:获取请求的参数
@CookieValue:获取请求响应的cookie
@RequestBody:获取post的请求体(例如表单),只适用于POST
@RequestAttribute:获取request请求的传递数据,和你用request的get方法拿是一样的。
@MatrixVariable:矩阵变量注解是被SpringBoot默认关闭的,所以在使用前,我们要开启它。因为底层是使用UrlPathHelper解析,它会移除url分号及后续内容,也就是不支持矩阵变量。
1
2矩阵变量的书写格式
"/car/sell;low=11;brand=111,www,sasasa"在配置类中关闭去分号功能即可
1
2
3
4
5
6
7
8
9
10
11
12
13
14
15
public class WebConfig {
public WebMvcConfigurer webMvcConfigurer(){
return new WebMvcConfigurer() {
public void configurePathMatch(PathMatchConfigurer configurer) {
UrlPathHelper urlPathHelper = new UrlPathHelper();
// 不移除分号,矩阵变量生效
urlPathHelper.setRemoveSemicolonContent(false);
configurer.setUrlPathHelper(urlPathHelper);
}
};
}
}
Servlet API传参
即在方法参数调用HttpServletRequest等来获取请求里面的参数,我们最开始学JavaWeb的Servlet时就常用这种方式。
ServletRequestMethodArgumentResolver类的supportsParameter方法有全部参数支持
复杂参数:Model、Map等
自定义对象参数
我们写的pojo是怎么被前台调用参数的,关键是下面这个类ServletModelAttributeMethodProcessor来封装pojo。
1 | /* |
数据响应
响应json
引入spring-boot-starter-web,会自动引用spring-boot-starter-json,这样我们项目中就有了json相关的依赖,也就是有了jackson等包。
使用@RestController或@Controller + @ResponseBody给前台页面返回json数据。在RequestMappingHandlerAdapter类中通过结果解析器returnValueHandlers对结果进行解析。
视情况返回数据(内容协商)
我们对不同的需求,返回其对应的类型,json、xml等。
开启xml相关依赖,开始测试
1 | <dependency> |
测试后发现,页面的返回数据可以是json也可以是xml,打开调试台,可以发现请求头的Accept字段标明了数据类型是json还是xml,是根据这个来响应的。
内容协商原理
- 先判断是否响应头中是否有已确定的类型
- 没有确定类型,则查看客户端支持的类型,然后匹配最适合的类型,将我们的对象转换为该类型,然后就输出了。
Thymeleaf
基础设置
SpringBoot默认不支持JSP,我们需要引用第三方的技术来渲染界面
使用前引入依赖
1 | <dependency> |
Thymeleaf自动配置类,列举一些关键配置
1 |
|
ThymeleafProperties包含了全部的配置
SpringTemplateEngine模板引擎
ThymeleafViewResolver视图解析器
配置信息都会走ThymeleafProperties,如网页的前后缀,我们写页面就要按这个规则来。
1 | private String prefix = "classpath:/templates/"; |
语法
首先要导入前缀
1 | <html lang="en" xmlns:th="http://www.thymeleaf.org"> |
具体语法可以去官网看,就是写的时候要加入th前缀。页面和控制器相对应,展示一下示例:
1 |
|
1 | <body> |
我们使用thymeleaf的简介语法即可实现功能,可以动态修改超链接。
表达式
| 表达式名字 | 语法 | 用途 |
|---|---|---|
| 变量取值 | ${…} | 获取请求域、session域、对象等值 |
| 选择变量 | *{…} | 获取上下文对象值 |
| 消息 | #{…} | 获取国际化等值 |
| 链接 | @{…} | 生成链接 |
| 片段表达式 | ~{…} | jsp:include 作用,引入公共页面片段 |
拦截器
自定义拦截器,实现HandlerInterceptor接口
1
2
3
4
5
6
7
8
9
10
11
12
13
14public class LoginInterceptor implements HandlerInterceptor {
public boolean preHandle(HttpServletRequest request, HttpServletResponse response, Object handler) throws Exception {
HttpSession session = request.getSession();
Object loginUser = session.getAttribute("loginUser");
if(loginUser != null){
return true;
}
request.setAttribute("msg","您还未登录!请重新登录");
request.getRequestDispatcher("/").forward(request,response);
return false;
}
}注册拦截器到容器中,调用WebMvcConfigurer接口的addInterceptors方法
注意需要放行静态资源
1
2
3
4
5
6
7
8
9
10
11
12
public class AdminWebConfig implements WebMvcConfigurer {
public void addInterceptors(InterceptorRegistry registry) {
registry.addInterceptor(new LoginInterceptor())
//全路径拦截,包括静态资源
.addPathPatterns("/**")
//放行请求
.excludePathPatterns("/","/login","/css/**",
"/fonts/**","/images/**","/js/**");
}
}HandlerInterceptor接口有三种拦截方法
- preHandle:执行目标方法之前拦截
- postHandle:执行目标方法之后拦截
- afterCompletion:页面渲染之后拦截
文件上传
表单文件上传要标明multipart/form-data,多文件声明上传使用multiple
1
2
3
4
5
6
7
8
9
10
11
12
13
14
15
16
17
18
19
20
21
22
23<div class="panel-body">
<form role="form" th:action="@{/upload}" method="post" enctype="multipart/form-data">
<div class="form-group">
<label for="exampleInputEmail1">邮箱</label>
<input type="email" name="email" class="form-control" id="exampleInputEmail1" placeholder="Enter email">
</div>
<div class="form-group">
<label for="exampleInputPassword1">名字</label>
<input type="text" name="username" class="form-control" id="exampleInputPassword1" placeholder="Password">
</div>
<div class="form-group">
<label for="exampleInputFile">头像</label>
<input type="file" name="headerImg" id="exampleInputFile">
<p class="help-block">Example block-level help text here.</p>
</div>
<div class="form-group">
<label for="exampleInputFile">多照片</label>
<input type="file" name="photos" multiple>
<p class="help-block">Example block-level help text here.</p>
</div>
<button type="submit" class="btn btn-primary">提交</button>
</form>
</div>文件上传,MultipartFile,transferTo获取上传文件的流,也就是封装过流操作
1
2
3
4
5
6
7
8
9
10
11
12
13
14
15
16
17
18
19
20
public String upload( String email,
String username,
MultipartFile headerImg,
MultipartFile[] photos) throws IOException {
if(!headerImg.isEmpty()){
String originalFilename = headerImg.getOriginalFilename();
headerImg.transferTo(new File("D:\\xxx\\" + originalFilename));
}
if(photos.length > 0){
for(MultipartFile photo : photos){
if(!photo.isEmpty()){
String originalFilename = photo.getOriginalFilename();
photo.transferTo(new File("D:\\xxx\\" + originalFilename));
}
}
}
return "main";
}自定义文件上传的大小设置,springboot会自动配置MultipartResolver文件上传解析器,然后会定义好文件上传的大小限制,我们可以自行修改。
1
2
3# 单文件和整体文件
=10MB
=100MB
异常处理
错误返回情况
一般我们请求出现404、500错误是时,使用不同客户端会用不同方式来表示信息,浏览器访问使用网页返回信息、其他情况,如Postman直接发送请求返回则是JSON。
我们可以自定义这些错误响应界面。默认的路径是templates/error下的页面会被自动解析为错误响应界面
Web原生组件注入
注解注入
我们首先要在主程序类上声明**@ServletComponentScan(basePackages = “com.tang”)**
Servlet:**@WebServlet(urlPatterns = “/servlet”),在servlet类**上加入注解以及访问路径,只要该类在主程序扫描范围内,就可直接响应
Filter:**@WebFilter(urlPatterns = {“/css/“,”/images/“})**,过滤器对应要生效的路径
Listener:**@WebListener**,使用注解的类就开始监听
配置类注入
我们写好servlet、filter、listener组件后,到配置内中进行注入。
1 |
|
DispatcherServlet注入原理(配置类注入)
SpringBoot自动配置的DispatcherServletAutoConfiguration,走的就是MVC的配置文件:spring.mvc
1
public DispatcherServlet dispatcherServlet(WebMvcProperties webMvcProperties) {···}
然后为了实现这个Servlet,使用我们上面的配置类注入方法
1
public class DispatcherServletRegistrationBean extends ServletRegistrationBean<DispatcherServlet>
很明显使用了ServletRegistrationBean这个类来进行配置
默认映射路径
1
DispatcherServletRegistrationBean registration = new DispatcherServletRegistrationBean(dispatcherServlet, webMvcProperties.getServlet().getPath());
在MVC配置文件中,这个路径默认就是”/“
精确优先
当多个Servlet能处理同一层路径,使用精确优先原则。
1、/my
2、/
例如我们上面自定义的 /my 路径和默认 / 路径,我们输入my后会优先走自定义的Servlet,而不是默认的DispatcherServlet。没有精确定义时,比如走 /me 路径,我们还是会走DispatcherServlet。
嵌入式Servlet容器的实现原理
简单来说就是SpringBoot自带Tomcat是如何配置的。但注意Servlet容器不只包含Tomcat,也就是说Tomcat是Servlet容器的子集。
首先我们导入了Web的场景包,创建了一个web应用,然后该web应用会创建一个特殊的web ioc容器ServletWebServerApplicationContext
这个特殊ioc容器就是一个ApplicationContext,它启动时会寻找一个ServletWebServerFactory,也就是一个Servlet的web服务器工厂,然后这个工厂就会去配置一个web服务器
我们SpringBoot底层默认配置了三种Web服务的自动配置工厂
- TomcatServletWebServerFactory
- JettyServletWebServerFactory
- UndertowServletWebServerFactory
在底层有一个ServletWebServerFactoryAutoConfiguration的web服务工厂自动配置类,这个自动配置类还导入了ServletWebServerFactoryConfiguration普通配置类。
在ServletWebServerFactoryConfiguration配置类中就引入了Tomcat、Jetty、Undertow这三个工厂。配置类会根据你导入的包进行动态判断,比如我们现在默认配置的是Tomcat的包,我们自动创建的就是Tomcat的工厂TomcatServletWebServerFactory。
Tomcat的工厂就会创建Tomcat的服务器并启动
1
2
3protected TomcatWebServer getTomcatWebServer(Tomcat tomcat) {
return new TomcatWebServer(tomcat, this.getPort() >= 0, this.getShutdown());
}在TomcatWebServer类的**initialize()**方法就是初始化和启动(this.tomcat.start();)
我们发现导入的web启动器默认配置的就是Tomcat
1
2
3
4
5
6<dependency>
<groupId>org.springframework.boot</groupId>
<artifactId>spring-boot-starter-tomcat</artifactId>
<version>2.5.2</version>
<scope>compile</scope>
</dependency>
数据访问
SpringBoot默认数据源Hikari
数据源配置
1 | <dependency> |
可以发现这个数据源启动器导入了HikariCP、jdbs、事务的相关依赖,但由于我们的数据库使用不同,并没有导入数据库的驱动。
注意在自己配置数据库是时,最好写明自己使用的版本,因为官方版本可能过高会不匹配。
1 | <!-- springboot默认版本 --> |
jdbc数据源启动器自动配置
DataSourceAutoConfiguration
引用配置文件DataSourceProperties.class,可修改spring.datasource进行自定义。
PooledDataSourceConfiguration连接池的配置
1
2
3
4
5
6
7
8
protected static class PooledDataSourceConfiguration {
protected PooledDataSourceConfiguration() {
}
}注意是当我们没有配置连接池时,springboot才会为我们配置连接池,通过一些配置文件。
默认配置的是Hikari连接池
DataSourceTransactionManagerAutoConfiguration:事务管理的自动配置
JdbcTemplateAutoConfiguration:JdbcTemplate的自动配置,用于对数据库进行crud
1
2
3
4
5
6
7
8
9
10
public class JdbcTemplateAutoConfiguration {
public JdbcTemplateAutoConfiguration() {
}
}其配置文件,我们要修改时使用spring.jdbc
1
2
public class JdbcProperties{···}然后通过JdbcTemplateConfiguration注册的组件是JdbcTemplate
1
2
3
4
5
6
7
8
9
10
11
12
13
JdbcTemplate jdbcTemplate(DataSource dataSource, JdbcProperties properties) {
JdbcTemplate jdbcTemplate = new JdbcTemplate(dataSource);
Template template = properties.getTemplate();
jdbcTemplate.setFetchSize(template.getFetchSize());
jdbcTemplate.setMaxRows(template.getMaxRows());
if (template.getQueryTimeout() != null) {
jdbcTemplate.setQueryTimeout((int)template.getQueryTimeout().getSeconds());
}
return jdbcTemplate;
}
配置数据库(yml)
1 | spring: |
测试
自动装配JdbcTemplate组件,然后进行简单sql测试
1 |
|
Druid数据源
相关依赖
1 | <dependency> |
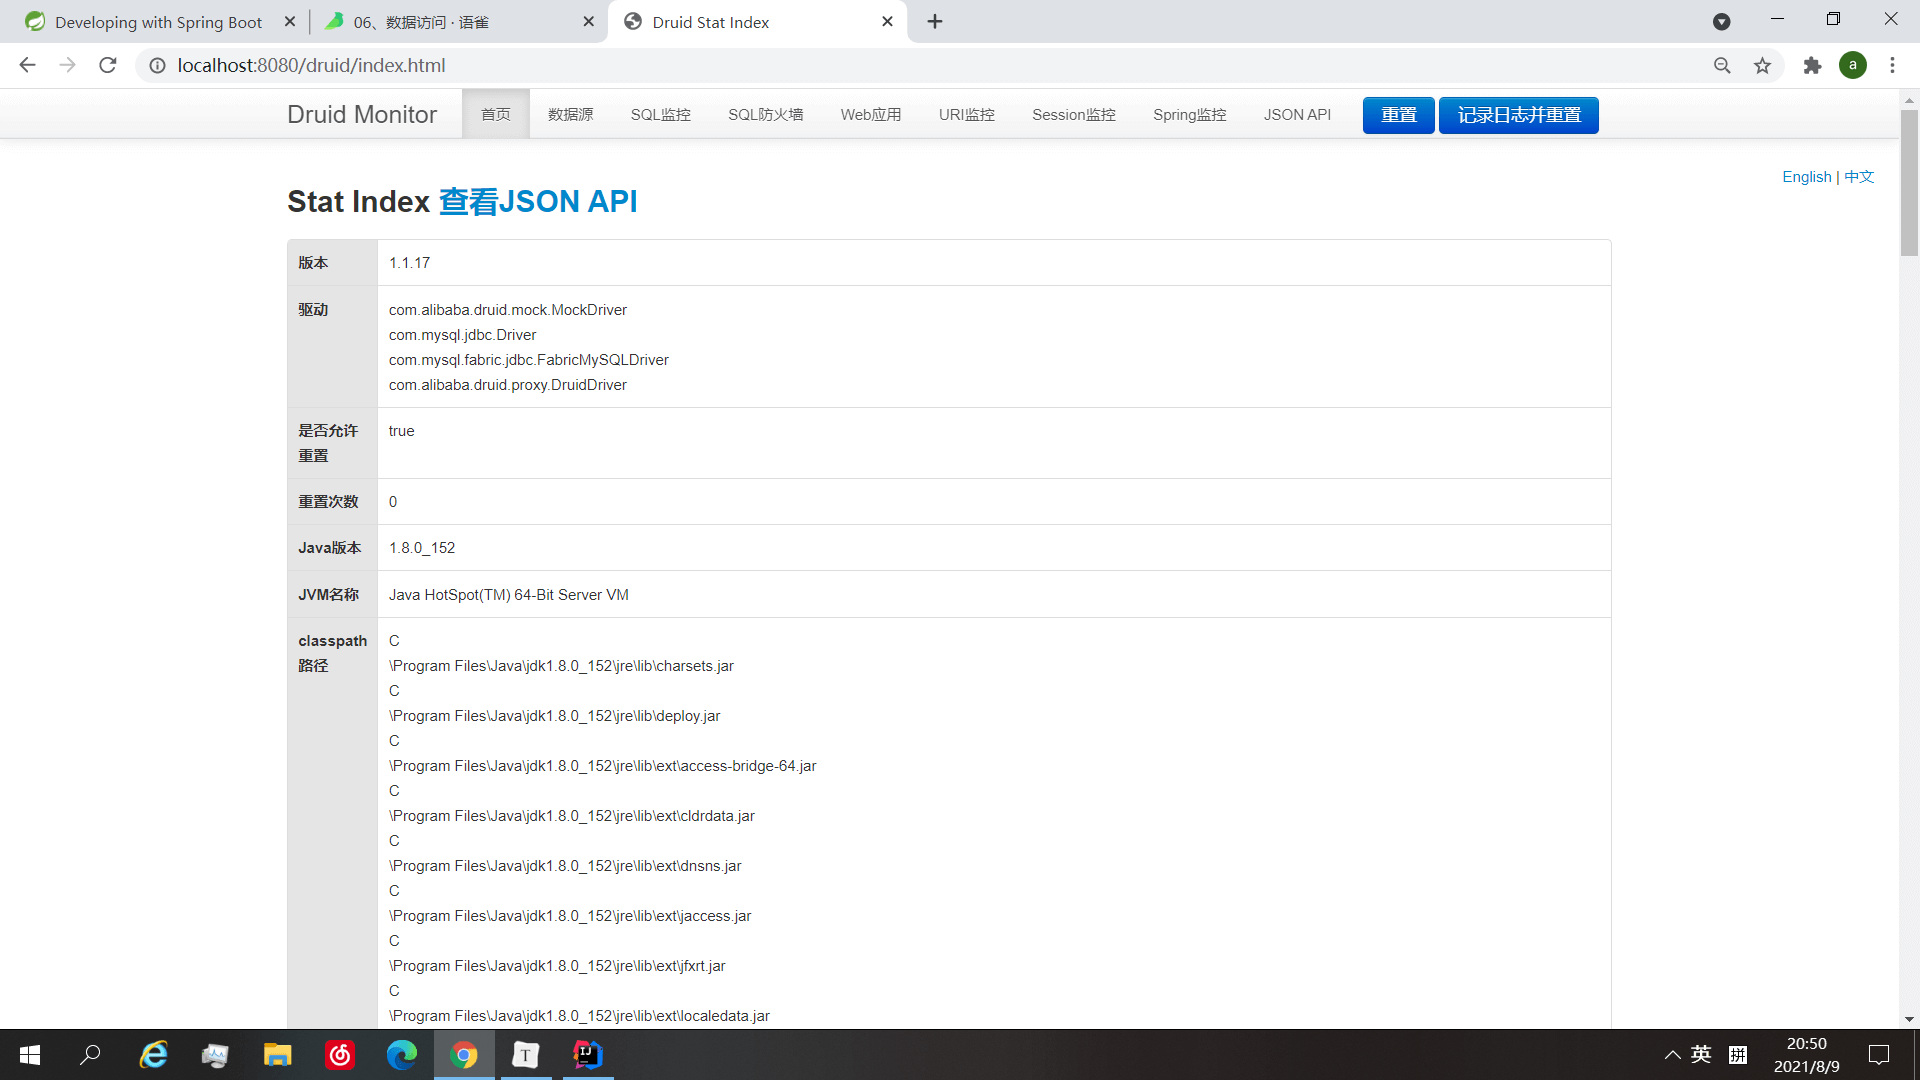
Druid内置监控页(自行配置)
官方配置指导:https://github.com/alibaba/druid/wiki/%E9%85%8D%E7%BD%AE_StatViewServlet%E9%85%8D%E7%BD%AE
原本是配置在WEB-INF/web.xml中
1 | <servlet> |
现在直接写一个配置类来引用即可,在druid数据源配置类中配置,注意数据源要加入相应功能的Filter。
1 |
|
访问http://localhost:8080/druid即可进入监控页,web相关监控都开启了
监控配置优化(使用官方配置,并自定义)
使用官方配置的依赖,注意之前配置的druid依赖要注掉,以防冲突。
1 | <dependency> |
简化配置,我们直接在yml中配置即可,不用再去写类了
1 | spring: |
MyBatis整合
启动器依赖
1 | <dependency> |
自动配置类相关简介
SqlSessionFactory自动配置
引用配置文件MybatisProperties.class,我们自定义时使用mybatis前缀
唯一数据源
1
2
3
4
5
6
public class MybatisAutoConfiguration implements InitializingBean {···}写了一个SqlSessionTemplate类型的方法,可以进行简单的crud
1
2
3
public SqlSessionTemplate sqlSessionTemplate(SqlSessionFactory sqlSessionFactory) {···}导入一个自动Mapper扫描,只要有标明**@Mapper**的接口就会被自动 扫描
1
2
3
4
public static class MapperScannerRegistrarNotFoundConfiguration implements InitializingBean {···}
多种配置方法
手动配置
yml配置文件配置mybatis配置文件和mapper路径,注意下划线这种配置只能导入一次,也就是说可以在配置文件中配置,然后导入配置文件,或者直接在yml中配置,建议就是去除mybatis-config.xml
1
2
3
4
5
6
7
8
9# 配置mybatis配置文件 及 sql映射mapper
mybatis:
# config-location: classpath:mybatis/mybatis-config.xml
mapper-locations: classpath:mybatis/mapper/*.xml
# 下划线转驼峰命名
configuration:
map-underscore-to-camel-case: true
# 别名配置
type-aliases-package: com.tang.bean对应mybatis配置文件的情况
1
2
3
4
5
6
7
8
9
10
11
12
13
14
15
16
<configuration>
<!-- 数据库_下划线与驼峰命名转换开启
也就是 user_name 转换为 userName-->
<settings>
<setting name="mapUnderscoreToCamelCase" value="true"/>
</settings>
<typeAliases>
<package name="com.tang.bean"/>
</typeAliases>
</configuration>dao层,使用**@Mapper**,一定不能漏,注入mapper
1
2
3
4
public interface PersonMapper {
public Person getPerson(Integer id);
}service层和controller层和以前一样,就是dao层要注意加一个@Mapper将mapper进行注入,以前都是在applicationcontext.xml里面配置包名分析的,这里不使用。
注解配置
也就是简单的sql语句可以用注解写,mapper的xml都不用定义了
1 |
|
混合配置
结合手动与注解两种模式,也就是mapper的sql写法有区别,其他的配置没有区别。我们简单sql语句可以用注解配置,复杂sql如动态sql还是需要mapper.xml来配置。
MyBatis-plus
依赖
它包含了jdbc启动器和mybatis启动器
1 | <dependency> |
自动配置类MybatisPlusAutoConfiguration
1 |
|
MybatisPlusProperties.class,走的这个配置类,自定义前缀是mybatis-plus
配置类中配置了mapper的默认位置,即mapper文件夹下所有xml后缀文件
1
private String[] mapperLocations = new String[]{"classpath*:/mapper/**/*.xml"};
自动配置类还导入了AutoConfiguredMapperScannerRegistrar.class,可以扫描**@Mapper**注解
@Mapper,单一扫描,写在dao层接口上
@MapperScan (“com.tang.dao”),使用批量扫描也可以,写在主入口上,但是service层调mapper时会显示bean没有,不影响使用,因为未编译时没有识别。可以加@Repository不报红,但这又和直接用@Mapepr没区别了,想直接包扫描就是为了不一一配置,感觉idea这一块逻辑识别没处理好。
CRUD
我们的mapper可以直接继承**BaseMapper< T >**,泛型写我们数据库对应的pojo封装类,然后就可以用BaseMapper的CRUD方法了。
相应的service层接口继承**IService< T >,接口实现类Impl继承ServiceImpl<M, T>**,这里M代表对应的Mapper,T就是数据库对应的pojo。
注意若在封装类声明了数据库不存在的字段,需要加上注解**@TableField(exist = false)**
注意不能使用别名配置,在xml的文件配置中偷懒,mybatis-plus是不兼容别名配置的,应该说它是直接识别全路径的,我们配置包别名则会失效。
如果我们表名和pojo不一致时,泛型还是使用该pojo,但需要在pojo类上加入注解**@TableName(“···”)**即可
删除和查询的小实现
dao-service-controller三层代码(这里在入口加了@MapperScan,所以没有加上@Mapper)
1 | public interface UserMapper extends BaseMapper<User> {} |
对应的表格(注意thymeleaf语法的参数获取)
1 | <table class="display table table-bordered table-striped" id="dynamic-table"> |
Redis
启动器
1 | <dependency> |
自动配置(RedisAutoConfiguration)
1 |
|
走redis配置类,配置前缀是spring.redis
导入了两个连接工厂:LettuceConnectionConfiguration、JedisConnectionConfiguration
操作redis使用RedisTemplate、StringRedisTemplate,一个是<Object, Object>形式,另一个是单独用于字符串的。
单元测试
常用注解
官网:https://junit.org/junit5/docs/current/user-guide/#writing-tests-annotations
**@Test :**表示方法是测试方法。但是与JUnit4的@Test不同,他的职责非常单一不能声明任何属性,拓展的测试将会由Jupiter提供额外测试
**@ParameterizedTest :**表示方法是参数化测试,下方会有详细介绍
**@RepeatedTest :**方法进行多次测试
**@DisplayName :**为测试类或者测试方法设置展示名称
**@BeforeEach :**表示在每个单元测试之前执行,每个都执行
**@AfterEach :**表示在每个单元测试之后执行,每个都执行
**@BeforeAll :**表示在所有单元测试之前执行,整体执行一次
**@AfterAll :**表示在所有单元测试之后执行,整体执行一次
**@Tag :**表示单元测试类别,类似于JUnit4中的@Categories
**@Disabled :**表示测试类或测试方法不执行,类似于JUnit4中的@Ignore
**@Timeout :**方法超时判断
**@ExtendWith :**为测试类或测试方法提供扩展类引用
断言(assertions)
- 基本断言
| 方法 | 说明 |
|---|---|
| assertEquals | 判断两个对象或两个原始类型是否相等 |
| assertNotEquals | 判断两个对象或两个原始类型是否不相等 |
| assertSame | 判断两个对象引用是否指向同一个对象 |
| assertNotSame | 判断两个对象引用是否指向不同的对象 |
| assertTrue | 判断给定的布尔值是否为 true |
| assertFalse | 判断给定的布尔值是否为 false |
| assertNull | 判断给定的对象引用是否为 null |
| assertNotNull | 判断给定的对象引用是否不为 null |
数组断言:assertArrayEquals
组合断言:assertAll,全部断言通过才算ok,使用lambda表达式测试
1
2
3
4
5
6
7
8
void test4(){
assertAll("Math",
() -> assertEquals(2, 1 + 1),
() -> assertTrue(1 > 0)
);
}异常断言:assertThrows(),()内一定抛出异常则通过
快速失败:fail(),一定失败
超时断言:assertTimeout,超时则失败
前置条件(assumptions)
只要测试类不满足前置条件,则直接跳过测试方法。这和断言有些许不同。也就是两个机制对失败的处理不同。一种是报错,另一种是直接跳过。
1 |
|
嵌套测试
类似@BeforeEach(All)的注解,只能是嵌套内层调用外层的,外层无法使用内层注解。
使用**@Nested**和Java内部类可以进行嵌套测试。
1 |
|
参数化测试
官网:https://junit.org/junit5/docs/current/user-guide/#writing-tests-parameterized-tests
与就是说可以多个参数执行同一个测试。
@ValueSource: 为参数化测试指定入参来源,支持八大基础类以及String类型,Class类型
@NullSource: 表示为参数化测试提供一个null的入参
@EnumSource: 表示为参数化测试提供一个枚举入参
@CsvFileSource:表示读取指定CSV文件内容作为参数化测试入参
@MethodSource:表示读取指定方法的返回值作为参数化测试入参(注意方法返回需要是一个流)
1 | public class ParamTest { |
注意
官网:https://junit.org/junit5/docs/current/user-guide/#migrating-from-junit4-tips
Junit4和Junit5注解使用有很大差别,我们可以根据官方的解释来更替。
指标监控
基本使用
1 | <dependency> |
yml配置management,打开监控节点
1 | management: |
启动项目,在http://localhost:8080/actuator下有,这些就是actuator下可监控的访问路径
1 | {"_links":{"self":{"href":"http://localhost:8080/actuator","templated":false},"beans":{"href":"http://localhost:8080/actuator/beans","templated":false},"caches-cache":{"href":"http://localhost:8080/actuator/caches/{cache}","templated":true},"caches":{"href":"http://localhost:8080/actuator/caches","templated":false},"health":{"href":"http://localhost:8080/actuator/health","templated":false},"health-path":{"href":"http://localhost:8080/actuator/health/{*path}","templated":true},"info":{"href":"http://localhost:8080/actuator/info","templated":false},"conditions":{"href":"http://localhost:8080/actuator/conditions","templated":false},"shutdown":{"href":"http://localhost:8080/actuator/shutdown","templated":false},"configprops":{"href":"http://localhost:8080/actuator/configprops","templated":false},"configprops-prefix":{"href":"http://localhost:8080/actuator/configprops/{prefix}","templated":true},"env":{"href":"http://localhost:8080/actuator/env","templated":false},"env-toMatch":{"href":"http://localhost:8080/actuator/env/{toMatch}","templated":true},"loggers":{"href":"http://localhost:8080/actuator/loggers","templated":false},"loggers-name":{"href":"http://localhost:8080/actuator/loggers/{name}","templated":true},"heapdump":{"href":"http://localhost:8080/actuator/heapdump","templated":false},"threaddump":{"href":"http://localhost:8080/actuator/threaddump","templated":false},"metrics-requiredMetricName":{"href":"http://localhost:8080/actuator/metrics/{requiredMetricName}","templated":true},"metrics":{"href":"http://localhost:8080/actuator/metrics","templated":false},"scheduledtasks":{"href":"http://localhost:8080/actuator/scheduledtasks","templated":false},"mappings":{"href":"http://localhost:8080/actuator/mappings","templated":false}}} |
常用监控节点
| ID | 描述 |
|---|---|
auditevents |
暴露当前应用程序的审核事件信息。需要一个AuditEventRepository组件。 |
beans |
显示应用程序中所有Spring Bean的完整列表。 |
caches |
暴露可用的缓存。 |
conditions |
显示自动配置的所有条件信息,包括匹配或不匹配的原因。 |
configprops |
显示所有@ConfigurationProperties。 |
env |
暴露Spring的属性ConfigurableEnvironment |
flyway |
显示已应用的所有Flyway数据库迁移。 需要一个或多个Flyway组件。 |
health |
显示应用程序运行状况信息。 |
httptrace |
显示HTTP跟踪信息(默认情况下,最近100个HTTP请求-响应)。需要一个HttpTraceRepository组件。 |
info |
显示应用程序信息。 |
integrationgraph |
显示Spring integrationgraph 。需要依赖spring-integration-core。 |
loggers |
显示和修改应用程序中日志的配置。 |
liquibase |
显示已应用的所有Liquibase数据库迁移。需要一个或多个Liquibase组件。 |
metrics |
显示当前应用程序的“指标”信息。 |
mappings |
显示所有@RequestMapping路径列表。 |
scheduledtasks |
显示应用程序中的计划任务。 |
sessions |
允许从Spring Session支持的会话存储中检索和删除用户会话。需要使用Spring Session的基于Servlet的Web应用程序。 |
shutdown |
使应用程序正常关闭。默认禁用。 |
startup |
显示由ApplicationStartup收集的启动步骤数据。需要使用SpringApplication进行配置BufferingApplicationStartup。 |
threaddump |
执行线程转储。 |
在web程序下的附加节点:
| ID | 描述 |
|---|---|
heapdump |
返回hprof堆转储文件。 |
jolokia |
通过HTTP暴露JMX bean(需要引入Jolokia,不适用于WebFlux)。需要引入依赖jolokia-core。 |
logfile |
返回日志文件的内容(如果已设置logging.file.name或logging.file.path属性)。支持使用HTTPRange标头来检索部分日志文件的内容。 |
prometheus |
以Prometheus服务器可以抓取的格式公开指标。需要依赖micrometer-registry-prometheus。 |
health定制
单个节点配置,打开health,展示细节。
1
2
3
4
5management:
endpoint:
health:
enabled: true
show-details: alwaysinfo定制
可以获取pom.xml的信息,使用**@···@**来获取,这里info是最外层。
1
2
3
4
5info:
appName: boot-admin
version: 2.0.1
mavenProjectName: @project.artifactId@
mavenProjectVersion: @project.version@Metrics定制
定制Endpoint节点
自定义节点标明@Endpoint(id = “···”),这里id就是节点名称,类似前面的info、health。
@ReadOperation、@WriteOperation注解标明读写方法,对应访问节点的读写操作。
1
2
3
4
5
6
7
8
9
10
11
12
13
public class DockerEndpoint {
public Map getDockerInfo(){
return Collections.singletonMap("info","docker started...");
}
private void restartDocker(){
System.out.println("docker restarted....");
}
}
可视化界面(SpringBootAdmin)
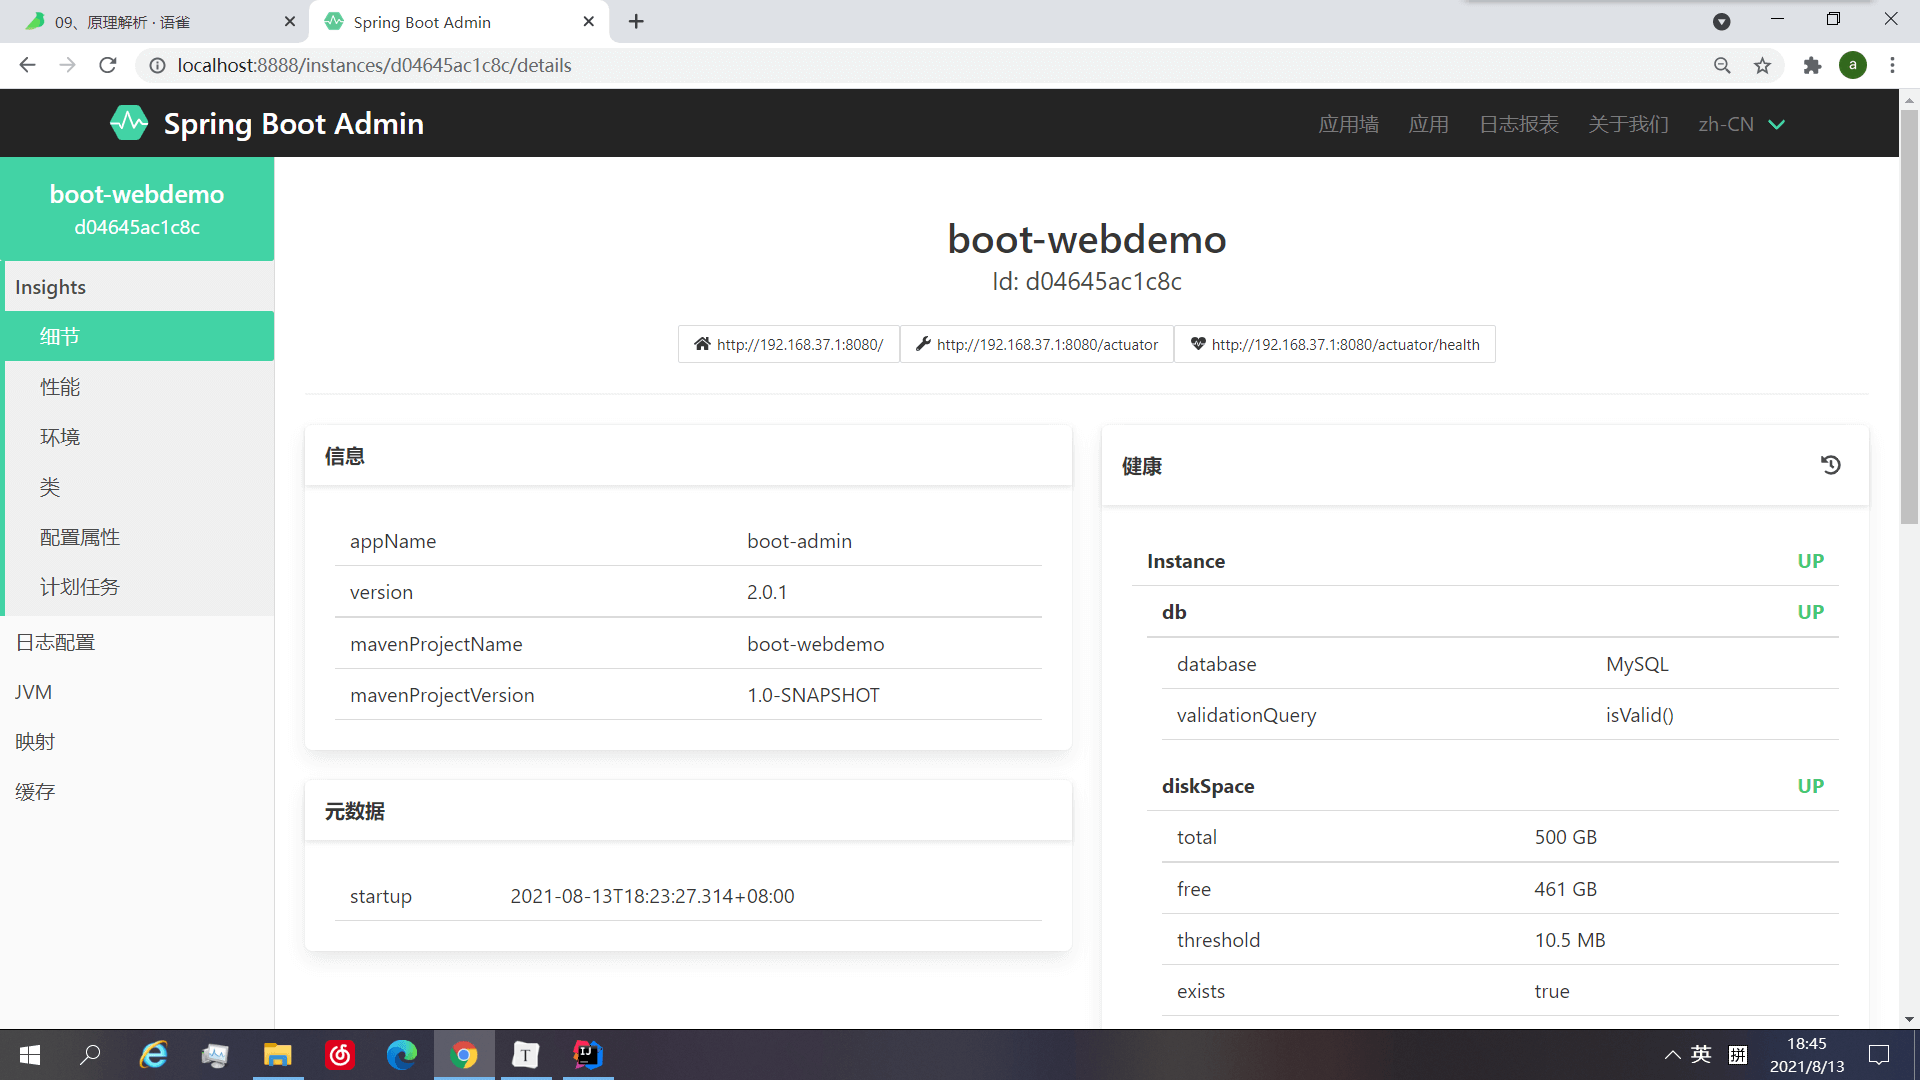
官网:https://codecentric.github.io/spring-boot-admin/2.4.3/#getting-started
按照官网的配置,新建一个项目做监控类即可,注意端口要修改,以免默认8080冲突,然后在需要监控的项目里进行对应配置。界面如下图:
部署相关
Profile(解决多环境配置问题)
默认配置文件:application.yml,该文件项目启动一定加载。
指定环境配置文件application-{xxx}.yml
要使用该环境则在默认文件中激活即可:
1
2
3spring:
profiles:
active: xxx还可以通过命令行激活配置文件,相对于配置文件的激活,命令行优先级更高。
默认配置和指定配置会同时生效。
注解@Profile(xxx),xxx为指定环境名,可写在类和方法上,只有对应的指定配置文件激活时,这个类或方法才能实现。
外部化配置(yml、properties等)
自定义启动器starter(模拟创建自动配置)
简单来说就是自己写一个starter启动器,里面引用了一些自己写的autoconfigure自动配置。然后通过maven打包,使用测试类来调用自动配置类的方法,发现这一切都是可行的。
也就是说spring的启动器和自动配置的构造就是如此。
hello-boot-starter
一个starter,作用仅仅是在pom.xml中引用自动配置的依赖
boot-starter-autoconfigure
走自动配置类,绑定相关配置类,如果没有相关方法的组件就创建相关方法。
相关配置类中要声明我们之后在自定义配置中的属性,即”tang.hello”,然后声明要使用的相关配置变量。
自动配置的组件则是我们根据配置变量执行的方法。
注意我们自动配置是读取spring.factories中指定类进行加载,所以要在resource\META-INF\spring.factories中声明要加载的自动配置类。
这些都执行后,通过maven打包安装到仓库,然后进行调用测试方法即可。
HelloServiceAutoConfiguration
这里配置类是一定要装配的,在类上声明;而@ConditionalOnMissingBean则是在对应方法上声明,如果声明到类上,则其他不相关方法也会不能使用,因为这个类就不创建了。
1
2
3
4
5
6
7
8
9
10
11
public class HelloServiceAutoConfiguration {
public HelloService helloService(){
HelloService helloService = new HelloService();
return helloService;
}
}HelloProperties
1
2
3
4
5
6
7
8
9
10
11
12
13
14
15
16
17
18
19
20
21
public class HelloProperties {
private String prefix;
private String suffix;
public String getPrefix() {
return prefix;
}
public void setPrefix(String prefix) {
this.prefix = prefix;
}
public String getSuffix() {
return suffix;
}
public void setSuffix(String suffix) {
this.suffix = suffix;
}
}HelloService
1
2
3
4
5
6
7
8public class HelloService {
HelloProperties helloProperties;
public String Hello(String name){
return helloProperties.getPrefix() + ":" + name + "," +helloProperties.getSuffix();
}
}spring.factories
位于resource\WETA-INF下
1
2org.springframework.boot.autoconfigure.EnableAutoConfiguration=\
com.tang.auto.HelloServiceAutoConfiguration
SpringBoot启动过程(后续待看)
入口的@SpringBootApplication注解前面讲过了。
这里主要是看看SpringApplication这个类,毕竟通过 SpringApplication.run跑起来的
小结
其实学了SSM,再来看SpringBoot还是比较容易的,起码用起来很容易。主要是用SpringBoot时不需要进行一些常规配置,所以未接触的人学起来就会懵逼,还是从SSM看过来比较好理解。接下来就是Redis、Docker、Vue,然后就是前后端分离项目,争取找一个部署CRUD的,毕竟SSM做的是CRUD管理项目。其实看了框架我还是明白了基础更重要,框架的底层可不是一时半会儿能看明白的,还是先去把并发、锁、IO相关的内容复习,还有排序算法。然后秋招面试进行查漏补缺。